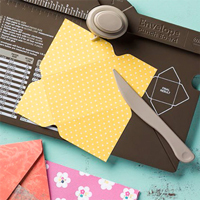
As I mentioned in my last blog post the Envelope Punch Board
is my favourite product at the moment.
There are loads of videos on You Tube so if you are thinking
of buying one definitely check those out, they will show you it is worth the
money.
At my party I wanted to show off the punch board and
everything it could do so I had samples of all the things I made with it and I
did a simple demo that everyone had a go at.
It is to make a 3D envelope but adapted so that it can hold
a treat as the top is left open.
Instructions below
Thanks
Crafty Page
Instructions
- Get a piece of paper sized 5 ½
inch by 5 ½ inch, and the envelope punch board
- Place the paper in at 2 inch and
punch and then score down the groove
- Slide the paper along to 2 5/8
inch punch and score
- Turn the paper round anti
clockwise
- Line up the marker with the first
score line
- Punch and score
- Slide the paper along so that the
marker lines up with the second score line
- Punch and score again
- Again turn the paper anti
clockwise line up the score lines and punch and score again
- On the last side punch and score
the first line. With the second line just punch
- On the paper you will now see all
the score lines
- There will be small squares where
the sides meet
- Cut out these squares
- Fold along all the score lines
- Find the flap with just one score
line
- Glue this and stick it down
- On the bottom flap put a dab of
glue on the point on the side that will be facing outwards
- Fold over a side flap and glue to
the bottom flap
- On the newly glued side flap put
glue on the point the same as we did on the bottom
- Also put a bit of glue on the
remaining flap but on the back that will be glued to the box
- Fold and glue
Shopping List